Tables are a wonderful way to organize data in your Word documents. A table can comprise multiple rows and columns where each combination of row and column is known as a cell. Each cell can have its text and different text formatting styles can be applied to the cell contents. Being a .NET application developer, you can provide the functionality of creating a table in a Word document in your document processing C# application.
This blog will show how to create a table in a Word document in C# using the free and open-source .NET API.
Insert Table in a Word Document using Microsoft Word
Before we can proceed to see how to create a table in a DOCX file, let us have a look at how we can do the same using Microsoft Word.
Steps to Create a Table in a Word Document using Microsoft Word
In order to create a basic table in a Word document, you can use the following steps.
- Open Microsoft Word. It will open a blank document
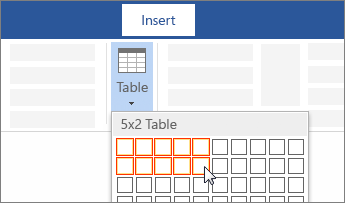
- Click Insert->Table. This will display a grid.
- Move the cursor over the grid until you highlight the number of columns and rows you want.
- Click when done and it will generate a table in the document
How to Create a Table in Word Document using C#?
Now that we have seen how to insert/create a table in a Word document using Microsoft Word, we can proceed towards doing the same using NPOI API for .NET in our C# application. If you haven’t already installed NPOI API, you can go through our comprehensive guide for NPOI API installation in your .NET project.
Step-by-step Guide to Creating Table in Word Document using C#
At this stage, your .NET project should be ready to write code for creating a simple Table in a Word document using NPOI API in C#. The following steps can be used for this purpose.
- Create an instance of XWPFDocument for a new document
- Create an instance of XWPFTable class for defining the table and specify the number of rows and columns for it
- Traverse through each cell of the table using the GetCell method on each row of the table and set its contents using the SetText method of XWPFRun instance
- Save the file to disc using the XWPFDocument instance defined in Step 1 above
You can use the following source code in your application to try it.
//Create document
XWPFDocument doc = new XWPFDocument();

//Create table
int row = 2;
int col = 3;
XWPFTable table = doc.CreateTable(row, col);
//Set table width
table.Width = 3000;
//Loop through the table
for (int i = 0; i < row; i++)
{
    for (int j = 0; j < col; j++)
    {
        XWPFTableCell cell = table.GetRow(i).GetCell(j);
        //Set style of the table
        XWPFParagraph para = cell.AddParagraph();
        XWPFRun run = para.CreateRun();
        run.IsBold = true;
        run.FontFamily = "NSimSun";
        run.SetText("This is Row" + i + "  and " + "Col" + j);
        table.GetRow(i).Height = (900);
        para.Alignment = ParagraphAlignment.LEFT;
        cell.SetVerticalAlignment(XWPFTableCell.XWPFVertAlign.CENTER);
    }
}
//Save the file
FileStream file = new FileStream("SimpleTable.docx", FileMode.Create);
doc.Write(file);
file.Close();
Conclusion
Tables provide an effective way to organize data in a presentable way in a Word document. This article showed how a simple table can be created using NPOI API in C#. A table can also include images and other types of data that we will be writing about in another blog. So stay tuned.